C#
Unity Engine
Since starting the restructuring and visual rework of the MegaPint packages last year the tools have come a long way. What started with a “simple” refactoring from the old to the new ui system turned out to be a much deeper transformation – both technically and conceptually. Ironically, the very first post I ever made about the project did not bother explaining what the project actually was – it just jumped straight into what would be changing. A strong start in the art of vague announcements. With this post I would like to redeem myself and explain everything about the project and where it currently stands.
What is MegaPint?
MegaPint – short for “MegaPint of Code” – takes its name from the now iconic joke about a MegaPint of wine. Because why not mix a little humour with serious development? What started as a humorous reference has grown into a quite capable collection of Editor Tools for the Unity Game Engine – ranging from autosaving scenes to automatically detecting and resolving issues within them. MegaPint is all about improving developer workflow and efficiency. Whether that’s through small quality of life changes or introducing features you did not know you needed.
Conceptual Changes
MegaPint previously existed as one big UPM package, bundling all features – whether you needed them or not. This resulted in a lot of unnecessary disk space usage. The MegaPint rework aimed to resolve this situation by shipping every tool as their separate UPM package. While shipping the tools as individual packages would reduce unnecessary disk space usage, it would ultimately shift the burden onto the user – who would now have to manually search for each tool and install it using the corresponding Git URL.
The solution? A new distribution system.
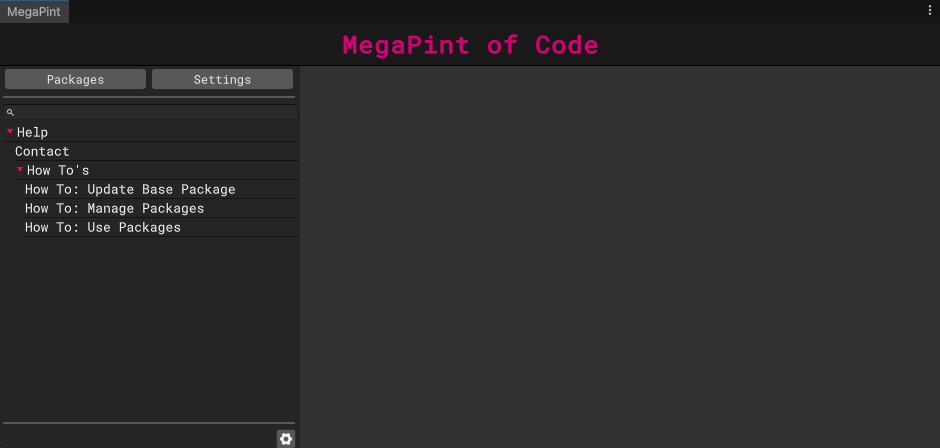
While each tool remains its own individual package, they can now be accessed through the MegaPint Package Collection. This new system let’s users pick and choose exactly which tools to install – without the hassle of tracking down Git URLs. It works by installing a single package into your Unity project. From there, you can browse the entire collection and import any tool within a single click. No copying, no pasting, no digging through repositories.
And the best part? It all happens right inside of the Unity Editor.
Since the system has a bit more going on behind the scenes, I’ll dive into the technical details in a separate blog post – you can check it out here.
Visual Changes
The previous version of the MegaPint collection was developed using the older IMGUI system of Unity. Since more modern solutions like the UI Toolkit are already in place and are continuously improved upon I decided to move forward using the UI Toolkit. Since refactoring the old ui code into the new system was nearly impossible and the concept of the whole system was to be redone, I ended up rebuilding everything fresh.
The old MegaPint tried to imitate the style and colors of the Unity Editor. Even though most of the colors matched the editor the rest of the styling did not. This was mostly due to some restrictions of the IMGUI system. The new MegaPint interface also mimics the look and feel of the Unity Editor to blend seamlessly with the user’s workflow, while maintaining its own distinctive color scheme so it is easily distinguishable from the default Unity interface.
The new interface isn’t just designed to look good – it’s built to feel good, too. A core design principle is that most functionality is accessible through editor commands (shortcuts) as well as visual elements like buttons and entire windows. This approach lets every user decide how much customization they want, tailoring their workflow to fit each task perfectly.
Current Tools
As mentioned in the previous rework announcement, version 1.0.0 includes not only the Package Manager – required for the new package distribution system – but also two additional tools. The first is a simple yet handy autosave utility for scenes. The second is a more advanced system that lets you define validatable requirements for your game objects. If an object does not meet these custom rules, it will automatically be flagged as invalid by the system. Let me briefly introduce those tools to you.
Scene – AutoSave
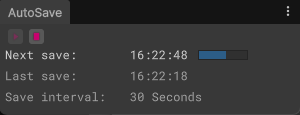
While Unity might save some project settings and files when it crashes, more often than not, any unsaved progress in your scene is simply lost. Sure, you could hit Save every few minutes – but let’s be honest, that’s not always realistic. That’s why having a script handle autosaving for you isn’t just convenient – it’s a lifesaver. Moreover to pack even more features in this somewhat smaller tool I decided to include a versioning mode. With this you may choose to not directly save the current changes onto the active scene but rather store than in a backup file with timestamp. So if you ever find yourself reworking the same thing repeatedly, you can simply roll back to a version from two hours ago.
Validators
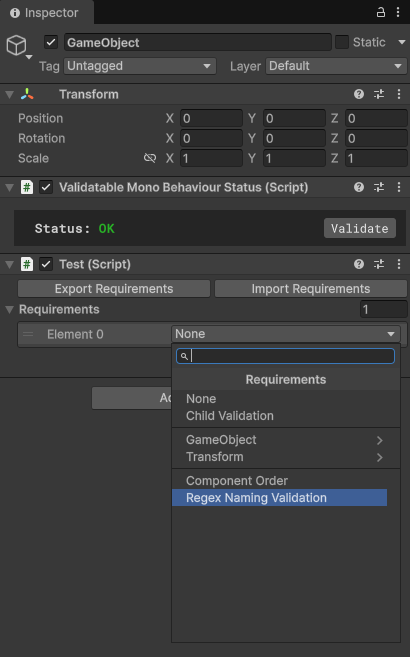
The validators tool is not only the most advanced tool in the MegaPint Collection – it’s also one of the most complex tools I have ever built personally. it allows you to define custom rules, or requirements, for specific Game Objects. When validation is triggered, the tool checks whether each object meets its assigned requirements and flags any that don’t. The system is highly modular: you can add as many requirements as needed and configure them directly on the Game Object itself. For example, you might have objects used for debugging or development – objects that should be disabled or removed in the release build. With Validators, you can enforce a rule that ensures these objects are disabled before the final build. You could also create requirements for naming conventions, ensuring consistency across your project.
While simply finding and flagging issues is already a huge help during development, being able to automatically fix those issues takes it to the next level. Nearly all base requirements in the Validators tool come with built-in auto-fix functionality.
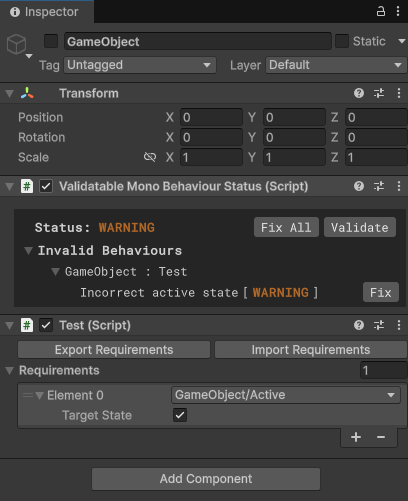
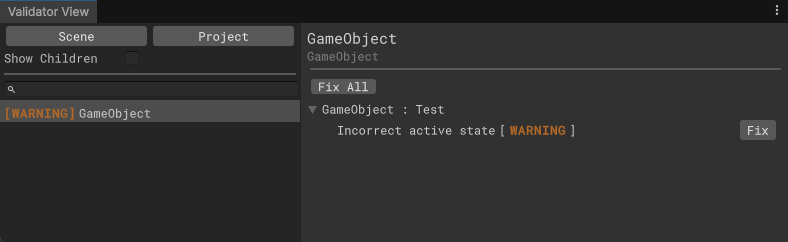
For example, if a Game Object is flagged because it’s inactive when it’s expected to be active, the system can automatically correct it by setting the object to the desired state. All the developer has to do is click a single button – right on the object.
But having to manually go over every object in the scene and check the status of the validation behaviour is unfeasible. Therefor Validators offers a dedicated window to find any issues within a scene or within the whole project. In this view you can directly compare all Game Objects of the scene that contain a ValidatableMonoBehaviour component on them. While all valid objects will return a correct state all invalid objects will be flagged with their corresponding issues. Better yet, you can resolve every issue across your entire scene with just one click.
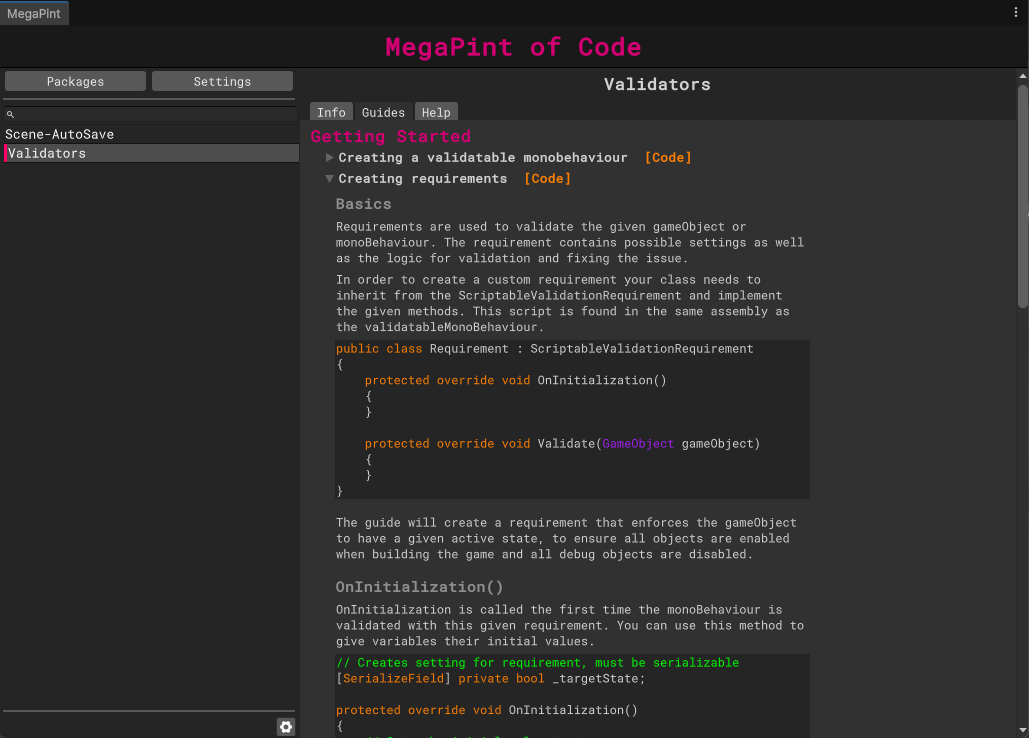
When setting up requirements for a Game Object, you will quickly realize that I can only provide a finite set of built-in checks. That’s why the Validators tool is fully extensible – you can create your own custom requirements tailored specifically to your project. All it takes is a bit of code: define a validation method to detect issues, and optionally implement an auto-fix method to resolve them. With this, you are free to build your own rules library, catch edge cases unique to your game and ensure that no hidden issues slip through the cracks.
And don’t worry – the entire creation process is thoroughly documented, right within the Unity Editor. From writing your first custom requirement to adding auto-fixes, everything is explained step-by-step so you are never left guessing.
It’s your project. Your rules. Your Standards. And with Validators, you finally have the power to enforce them.
Planned Tools
These two tools are just the beginning. Several more are already in development and will be added to the MegaPint Collection in due time – each designed to further streamline and enhance your Unity workflow. Confirmed tools that will be included in future updates of the MegaPint Collection are:
- Screenshots – a utility for capturing screenshots directly from the Unity Editor, both in edit mode and during runtime play sessions.
- Scene AutoStart – automatically launches your project in a predefined scene (like your main menu) no matter in which scene your in, saving time and clicks when working on and playtesting your games.
- Notepad – a lightweight feature that lets you attach notes to Game Objects, helping you store important context, reminders or to-dos right where they belong.
What now?
Over the coming months, I plan to release multiple updates to the MegaPint Collection – including the new tools mentioned above, improvements to existing ones and important work on the base package itself. My goal is to bring MegaPint to a solid, feature-complete state before I begin writing my bachelor’s thesis. Since I’ll be focusing on development, I likely wont be posting regular updates here on the blog. If you’d like to stay in the loop, feel free to follow the project on my GitHub profile.
And if you are curious to try out MegaPint for yourself, you can do so completely free by clicking the link below.
Thank you for reading – and happy developing!