C#
Unity Engine
It’s been a few months since my last update. During this time, I have regularly released new versions of MegaPint. Now, development will pause temporarily as I focus on my bachelor’s thesis, which evaluates the efficiency improvements brought by the MegaPint collection and explores tool development within the Unity Engine more broadly.
MegaPint has reached a stable, working state and is currently being tested by the participants of my thesis study. With this my priority shifts to completing the thesis, so active development on the tools will slow down significantly.
If you are not yet familiar with MegaPint but want to learn more, feel free to check out my earlier post from a few months ago or visit the MegaPint GitHub page.
Changes Since 1.0.0
The promise of an easy-to-use, modern design and concept included in version 1.0.0 was ambitious. After having several people test the distribution system and tools within the collection, I received significant feedback: while the concept was praised, many found the execution and interface usability to be clunky. As a result, I worked through multiple iterations to completely overhaul the collection interface, making it even easier to use and adding important features like dark and light mode support.
I also focused on improving visibility for main functions while reducing visual clutter – for example, by moving less critical information into hoverable hints.
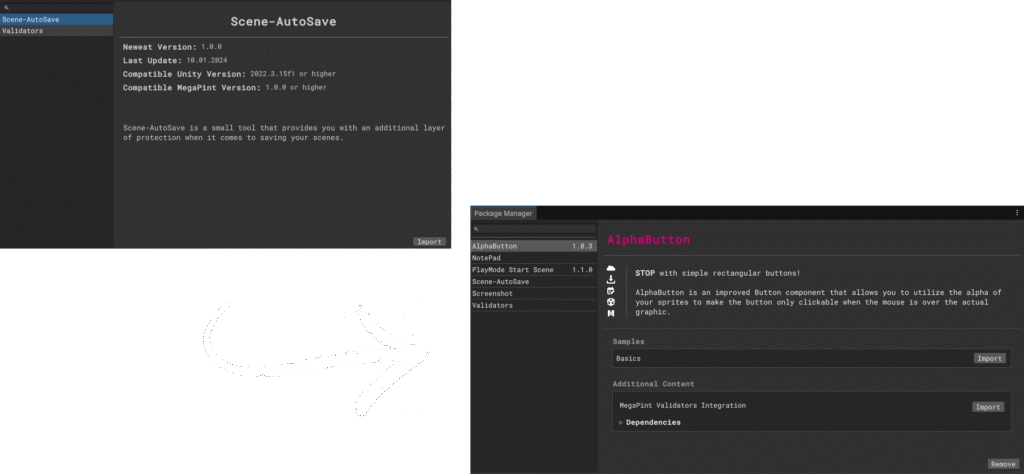
The distribution system itself was extensively enhanced as well. Improvements ranged from caching content and managing dependencies automatically to adding quality-of-life features like importable sample projects.
Scene – AutoSave
When it comes to functionality not much has changed within the auto save function. However, ever since I started developing this tool, it always bothered me that users had to manually open the auto save window each time they wanted the function to remain active. I always imagined a simple button integrated into Unity’s interface, that could control the saving behaviour. And that’s exactly what I did. After a long period of trial and error, countless debugging sessions and finally reaching an understanding of Unity’s Editor code, I was able to successfully embed my own visual elements directly into the Unity Editor’s toolbar.
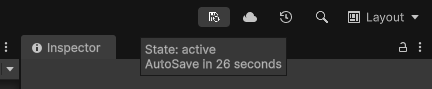
With this new streamlined way of toggling the auto save feature on and off, using the tool has become significantly more straightforward. For those who want more control, a detailed view is still available – showing the current mode and when the next save is scheduled to occur.
Validators
The Validators tool has undergone numerous iterations, always with the focus on wase of use and modularity. While the first version already offered a wide range of functions, the current version builds upon that foundation with several new system.
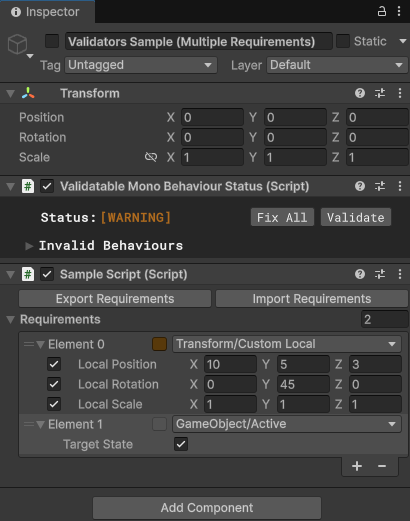
One challenge of the modular design was managing potential conflicts between validation requirements. For example, a custom requirement might override or invalidate an existing one – such as when one rule enforces a specific transform position, while another attempts to validate the same property with different values. To prevent such conflicts, requirements can now declare a list of incompatible requirements. If an incompatible requirement is already present on a Game Object, the new one cannot be added. In addition, the system has been enhanced with more flexibility: developers can now locally override the severity of validation requirements. This makes Validators not only more robust but also more adaptable to project-specific needs.
One of the most underrated – and often overlooked – features introduced in the first version of Validators was the ability to export and import requirement sets. This system was designed to streamline the process of setting up validations across similar Game Objects. For example, instead of manually recreating the same list of requirements for every enemy in your game, you could define the list once and import it wherever needed.
Despite its potential, the system remained largely unnoticed and was still too manual in its implementation. The new system now behaves much like Unity’s prefab workflow: you can override individual requirements locally and choose to apply those overrides back to the original set. Even better, you can now define a default Import file directly within the ValidateableMonoBehaviour base class – used by all validatable objects in the package. With this setup, once you define a default requirements list, for example, for enemy Game Objects, every instance automatically inherits the correct validation rules, with no manual importing required.
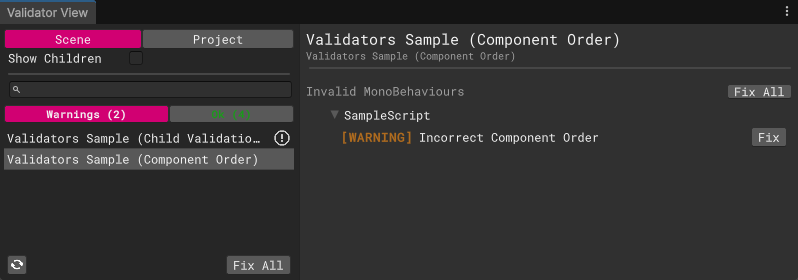
Beyond the technical changes, I also overhauled most of the interfaces to make them more intuitive and user friendly. For example, the Validator View now groups objects by their validation status, greatly reducing visual clutter and making it easier to navigate. The custom editor GUI for the Component Order configurations has also been improved to be more robust, preventing invalid or “questionable” user actions.
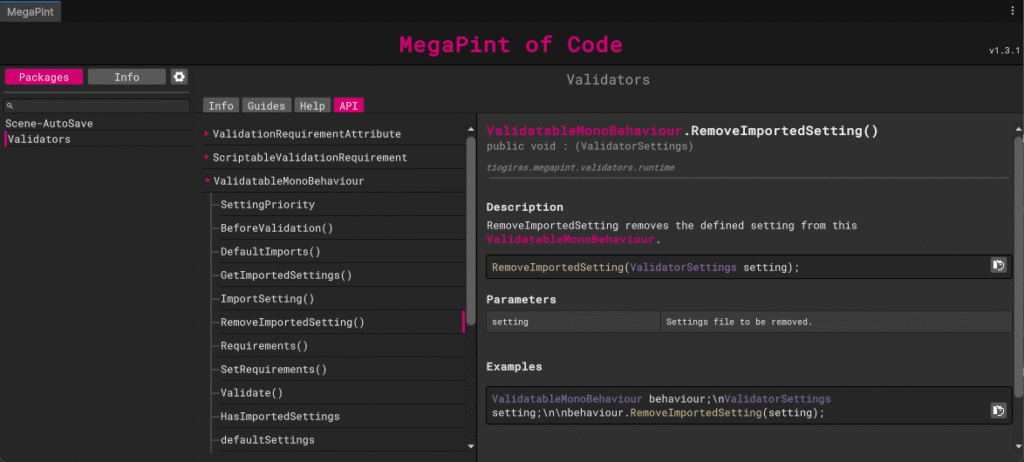
There are countless smaller tweaks and refinements throughout the tool – but with so many features and possibilities, you might wonder: how are you supposed to keep track of it all, or even get started with something this technical? The answer is simple. In addition to the updated setup guides, the package now includes full technical documentation built directly into the Unity Editor. Every class, method and variable you might encounter is clearly documented inside of the MegaPint Base Window.
With just a bit of time and exploration, you will be up to speed in no time – and well on your way of cleaning up your project from all those pesky, hidden issues.
New Tools
Since the first release, the collection has not only received updates but also seen the addition of entirely new tools. I would like to briefly introduce the remaining tools included in the current version.
Screenshots
Screenshots is a very powerful tool not only when it comes to taking marketing screenshots but also during development. As of now, the tool supports LWRP, URP and HDRP render pipelines and offers multiple capture methods right within the Unity Editor.
You can use Window Capture to take precise screenshots of any Unity Editor window, including custom tools, the inspector or even scene views. With a single click, you will get pixel perfect images of your editor UI exactly as it appears. Moving to in-game content, the Camera Capture component allows you to attach screenshot functionality directly to any camera in your scene. From customizable resolution and image depth to background overrides like transparency, solid color or custom images, you can instantly generate ready to use screenshots for marketing or documentation within the team. These customizations can also be used to easily generate icons for game items. Since you can put your icon background as the image background override and the actual object will be rendered above you can create icons right inside of the engine without the need to use other applications.

Even better the system supports Unity’s postprocessing stack and can even capture shots during runtime. By defining an export path and a hotkey you are already good to go. During play mode, just hit your capture key and the tool will automatically take screenshots from all configured cameras simultaneously. Want multiple angles? Set them up once and you will never miss that perfect shot again – whether it is for a trailer, social media or simply documenting the progress.
In short, this tool turns the once tedious task of capturing nice visuals into a seamless, one click workflow.
Autostart – Scene
There comes a time in every game projects when you implement the main menu. And more often than not, once it is in place, testing any game functionality means you are forced to go through it first. in projects structured in this way, working on and testing specific scenes quickly becomes a hassle – make changes in your target scene, manually switch to the main menu scene, hit play, then switch back again when you are done. These repeated steps are tedious and interrupt your workflow.
The Autostart tool, or as it is named in the collection – the Playmode Star Scene tool – solves this exact problem. It leverages on a native Unity feature that is normally hidden from plain sight. With this tool, you can assign any scene in your project as the default play mode start scene, which will automatically load whenever you hit play, regardless of which scene you are currently working in.
And because no single workflow fits all situations, the tool includes a handy toggle directly in Unity’s toolbar. Just as the updated Autosave tool, this button lets you quickly enable or disable the feature without digging through menus. In the end, its all about minimizing friction and keeping you focused on what matters – building your game, not fighting your Engine.
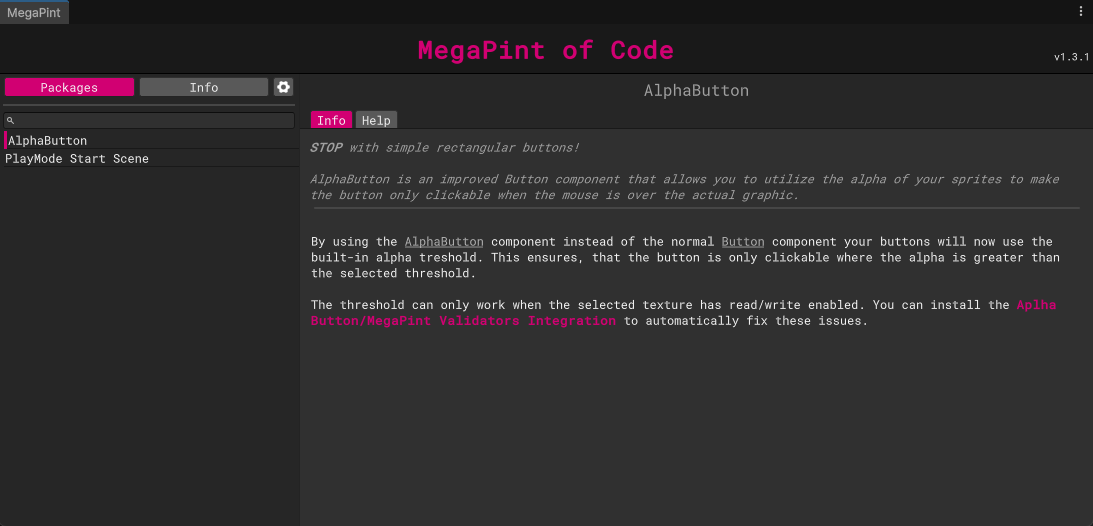
Alpha Button
Have you ever worked on a UI or 2D game where you had the perfect image for a button or interactive element – only to realize that Unity still uses the full rectangle of the image for interactions? I certainly have run into this issue countless times. While Unity technically supports alpha based hit detection, this functionality is mostly buried in internal APIs and out of reach for the average developer.
To solve this, I created a custom button component that behaves just like Unity’s standard button but with one key difference. It includes a slider that lets you define an alpha threshold for interactions. Set it to 1 and only full alpha pixels will register as clickable. Use a lower value to customize how transparent a pixel can be before it is no longer interactive. You can explore this behaviour in the sample scene included with the tool.
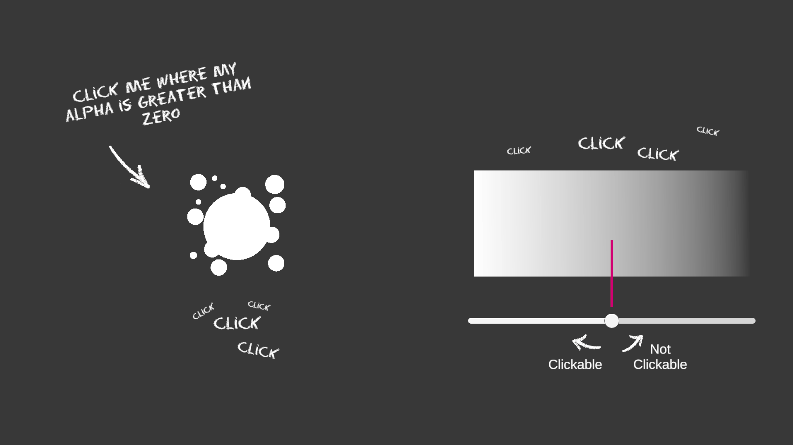
This gives precise control over what parts of an image actually respond to the users input. You can now use any shape or image as a button and it will only highlight or react when the cursor is really hovering over a visible part.
Notepad
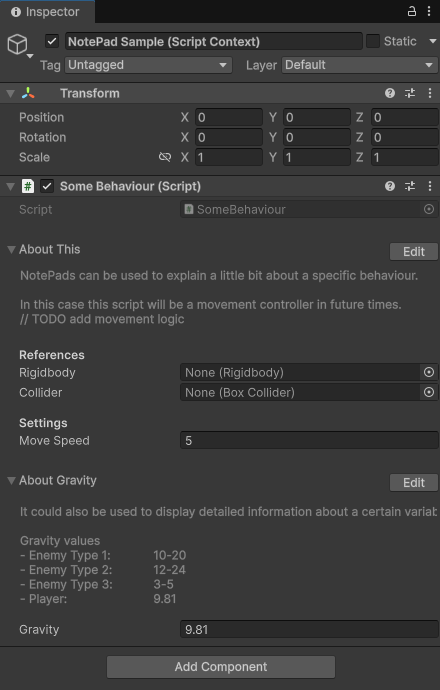
Notepad can be used to store information, to-dos, discussions or anything else you need to remember right on the Game Object it belongs to. In its current state, it requires a MonoBehaviour to be attached. Which is as simple as serializing a field of the correct type (as shown in the included guides within the tool). Once set up, you can enter any notes directly into the field and they will be saved specifically for that object. All notepads remain fully editable within the Unity Editor, giving you an easy and integrated way to keep context where it belongs.
It is a small feature with a big impact – because sometimes, the best way to stay organized is not another tool or external tracker, but simply writing things down where they matter the most.
With these tools in place, the current version of MegaPint stands strong and stable. Once I have more time to dedicate to the project, I look forward to expanding the collection with even more useful tools. There’s already a long list of ideas waiting to be brough to life.
Thank you for reading – and happy developing!